

DIY Soil Testing with Modern Kits: A 2025 Guide for Canadian Gardeners
On 2025-10-29 by Derrick TrantowHealthy soil is the foundation of every thriving garden. For decades, most homeowners relied on guesswork – adding fertilizer, lime, or compost without knowing what their soil actually needed. In 2025, affordable testing kits now make it possible for any Canadian gardener to move beyond trial and error and base decisions on reliable data.
This guide looks at the current options for DIY soil testing, how to choose among them, and when a professional lab test may still be worthwhile.
What DIY Soil Testing Means
Soil testing at home involves collecting a small sample from your yard or garden and analyzing it with a kit. Early home tests offered little more than a rough pH estimate, but modern kits now measure several important indicators of soil health.
The most common values include:
- pH – whether soil is acidic, neutral, or alkaline.
- Macronutrients – nitrogen (N), phosphorus (P), and potassium (K), essential for plant growth.
- Moisture and light levels (in digital probes).
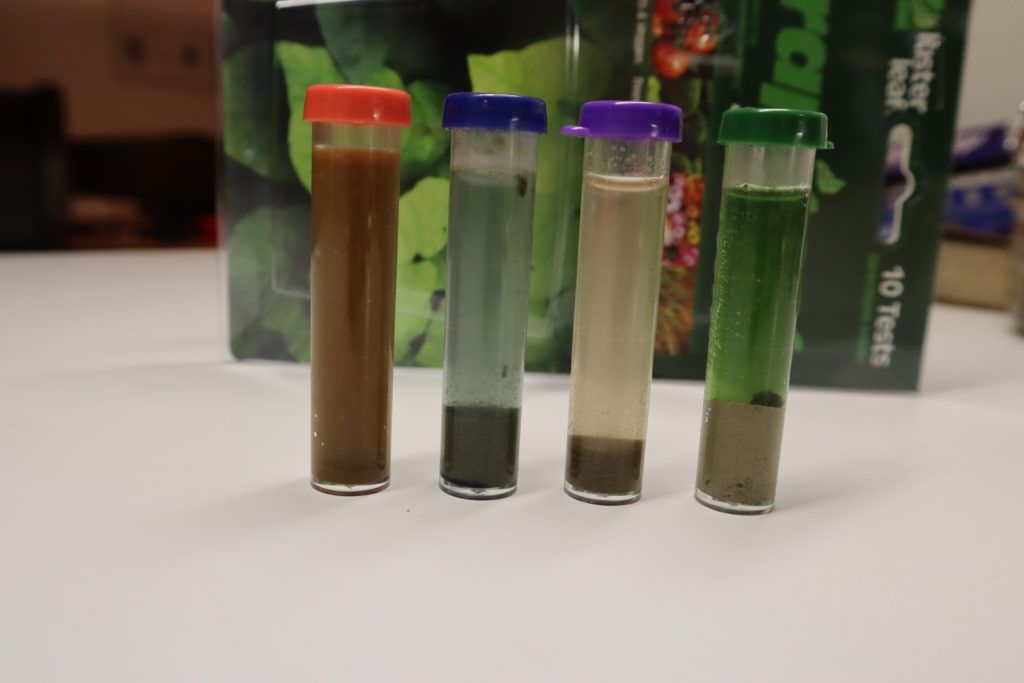
Depending on the kit, results may appear as colour changes on test strips or as digital readings on a handheld device.
Why Testing Matters
Soil testing provides practical benefits that go beyond curiosity.
- Better input management: Fertilizers are costly, and over-application contributes to nutrient runoff. A soil test helps apply only what is necessary. In addition, Statistics Canada data shows that soil testing practices vary widely across farm types, with many operations still under-testing their soil.
- Problem diagnosis: Poor growth, weak blooms, or discoloured leaves often trace back to nutrient imbalance or pH issues. Testing reveals whether the soil, rather than pests or weather, is the problem.
- Improved plant health: Matching amendments to actual needs encourages stronger roots, better disease resistance, and higher yields.
- Planning ahead: Autumn testing allows amendments to work over winter, preparing the soil for next spring’s planting season

Comparing Modern Soil Testing Options
The 2025 market includes several DIY kit formats, along with traditional lab services.
| Parameter | Chemical Colorimetric Kits | Digital Probe Testers | Mail-In Lab Analysis |
| Accuracy | Fair to Good | Good (especially for pH) | Very High |
| Typical Cost | Low ($15 – $30) | Moderate ($20 – $70) | Moderate to High ($50+) |
| Information Provided | pH, N, P, K | pH, Moisture, Light | Detailed pH, N-P-K, micronutrients, organic matter |
| Speed of Results | Minutes | Seconds | 1-2 weeks |
Each option serves a different purpose. Chemical kits give the most nutrient detail for the lowest cost, probes provide speed and ease of use, and lab tests remain the gold standard for precision.
Choosing the Right Kit
The right kit for you depends on your gardening ambitions and budget.
- Define Your Goal: Are you just curious about your soil’s general health, or are you trying to solve a specific problem with a vegetable garden? For a general pH reading to see if you need lime or sulphur, a digital probe is fast and effective. For an all-around check-up on your main nutrients, a chemical kit offers the most information for the price.
- Consider Ease of Use: Digital probes are the simplest- just insert and read. Chemical kits require a bit more effort, involving mixing soil with water and reagents, then comparing the resulting colour to a chart.
- Evaluate Your Budget: For a casual gardener, an affordable chemical kit is a perfect starting point. If you are a serious enthusiast or dealing with persistent issues, investing in a one-time mail-in lab test can provide a highly accurate baseline to guide your actions for years.
Getting Accurate Results
Regardless of the kit, accuracy depends on proper sampling. The following steps are key:
- Take multiple sub-samples: Soil is rarely uniform. Collect 5-7 cores from across the area and mix them together.
- Sample at the right depth: Most roots grow 4-6 inches deep. Collect soil from this zone, not just the surface.
- Avoid contamination: Use clean tools and containers. Oils or residues from hands or buckets can alter readings.
- Choose the right time: Do not test immediately after fertilizing, as results will be skewed. Spring and autumn are best. The Province of British Columbia also stresses that proper sampling technique is the single most important factor in getting meaningful soil test results.
Many gardeners lose accuracy not because of the kit, but because of how the soil is collected.
DIY Kits vs. Professional Lab Testing
The central debate for dedicated gardeners is whether a DIY kit is “good enough.” Modern kits for 2025 have certainly improved, offering a fantastic and affordable way for home gardeners to get actionable data. They are perfect for annual check-ups and guiding basic fertilization.
However, a professional test has advantages in certain situations:
- Establishing a baseline for a new garden.
- Investigating persistent plant health issues.
- Assessing soils for fruit trees, ornamentals, or large vegetable plots where micronutrient balance matters.
Lab analysis takes longer and costs more but delivers highly reliable and detailed data.
The Government of Manitoba provides official resources on soil testing services, showing how lab reports include nutrient levels, organic matter, and pH for highly precise recommendations.
Avoiding Common Mistakes
Several errors are frequently seen when homeowners rely on DIY kits:
- Relying on a single sample: Soil varies across even small spaces. Composite samples are essential.
- Testing only once: Conditions change seasonally. Regular testing gives a more accurate picture over time.
- Assuming results are exact: DIY kits provide guidance, not laboratory precision. Use them for direction rather than absolute numbers.
Correcting these practices ensures the data collected is meaningful and actionable.
Frequently Asked Questions (FAQ)
1. How do I know if DIY soil testing is enough for my garden, or if I should pay for a lab test?
DIY kits are perfect for routine check-ups – like figuring out if your soil needs lime, compost, or basic fertilizer before planting vegetables or flowers. They give quick, affordable results that guide most everyday gardening decisions. However, if you’ve tried amendments and plants are still struggling, or if you’re planning to establish fruit trees, ornamentals, or a large vegetable garden, a lab test is worth the investment for its precision and micronutrient detail.
2. What’s the most common mistake gardeners make when using soil testing kits?
The biggest error isn’t in the kit – it’s in the sampling. Many people test from just one spot, right at the surface, and then wonder why their results don’t match plant performance. Soil varies even within a single yard. Taking 5-7 samples from the root zone (4-6 inches deep), mixing them together, and avoiding contamination from dirty tools gives far more reliable results.
3. Which type of soil testing kit makes the most sense for a Canadian gardener on a budget?
If you just want a quick snapshot of pH, a digital probe is the easiest and most user-friendly option. For more detail on nutrients like nitrogen, phosphorus, and potassium, a chemical color kit provides the most information for the price. Serious hobbyists often combine the two – using a probe for quick seasonal checks and an inexpensive chemical kit once or twice a year for nutrient insights.
4. How often should I test my soil to keep my garden healthy year after year?
For most homeowners, testing once in spring and once in fall is ideal. Spring testing helps you decide what amendments to add before planting, while autumn testing gives fertilizers and lime time to break down over winter. Consistency is key – soil conditions shift over time, and regular testing ensures your garden keeps pace with changing nutrient needs.
Conclusion
DIY soil testing has advanced significantly in recent years. With modern kits, Canadian gardeners can now obtain useful data quickly and at low cost, enabling smarter decisions about fertilizers, amendments, and overall garden care.
While DIY kits are well suited for routine use, professional lab testing still holds value for complex cases or major garden planning. In both approaches, careful sampling is the most important factor in accuracy.
By integrating soil testing into your seasonal routine, you move beyond guesswork. Healthy soil supports healthier plants, and healthier plants create more productive gardens. A small investment of time and attention today can set the stage for your most successful gardening season yet.
Ontario’s Agricultural Soil Health Strategy emphasizes that regular testing and careful nutrient management are essential for long-term soil fertility across the province.